How to build AI Chatbot in ASP.NET Core using ChatGPT?
- Natural language processing.
- Contextual understanding of your followup converseation.
- Understand in multiple languages of your queries.
- Wide knowledge base.
- Ability to scale with deep learning.
- Support of multimodal - text, image and voice.
If you would like to bring the capabilities of ChatGPT to your custom ASP.NET Core application, here are the details how you can do the same.
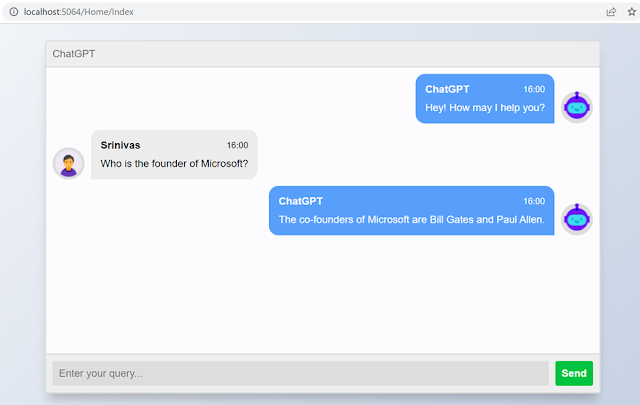
Here are I am going to describe you about creating the Chat BOT applicaiton which sends the user query to ChatGPT, get the response, and show the same in Chat interface. For this, you need to take 3 step process. Signup OpenAI for API key to accept queries from your application, Create custom Chat API in your application and chat interface for query conversations.
Step 1 (Get OpenAI API Key)
Go to OpenAI developer overview site, and here is the link:https://platform.openai.com/overview
After you sign up, navigate to View API keys page from the user account menu.
You will be
redirected to API keys p
Click on
the Create new secret key button to generate the API key. Once the key is
generated don’t forget to copy and save it in editors like notepad, etc. Once you
close the below API key generated dialog, you will not see it API key again. If
you lose it, you will have to regenerate the API key again.
Step 2 (Create Chat API)
Since I am going to have chat API and chat user interface in single application in this example, let’s pick ASP.NET Core Web App (MVC) application. You can still go for two different applications, one is Chat API for business logic and another is Front End application for presentation logic.
Go to visual studio and create ASP.NET Core Web App (MVC) application called ASPNETCoreChatGPT
In this example I am using .NET 7.0
Install the below packages to support Swagger and CORS middleware.
var builder = WebApplication.CreateBuilder(args);
builder.Services.AddControllersWithViews();
builder.Services.AddEndpointsApiExplorer();
builder.Services.AddSwaggerGen();

builder.Services.AddCors(options => { options.AddPolicy("AllowAllOrigins", builder => { builder.AllowAnyOrigin().AllowAnyMethod().AllowAnyHeader(); }); });

var app = builder.Build();
app.UseSwagger();
app.UseSwaggerUI();
app.UseStaticFiles();

app.UseRouting();
app.UseAuthorization();
app.MapControllerRoute(name: "default", pattern: "{controller=Home}/{action=Index}/{id?}");
app.UseCors("AllowAllOrigins");
app.Run();
public class ChatRequest
{
    public string model { get; set; }
    public Message[] messages { get; set; }
}
public class Message
{
    public string role { get; set; }
    public string content { get; set; }
}
public class HttpChatGPTResponse
{
    public bool Success { get; set; }
    public string Data { get; set; }
    public string Error { get; set; }
}
public class ChatResponse
{
    public string id { get; set; }
    public string _object { get; set; }
    public int created { get; set; }
    public Choice[] choices { get; set; }
    public Usage usage { get; set; }
}
public class Usage
{
    public int prompt_tokens { get; set; }
    public int completion_tokens { get; set; }
    public int total_tokens { get; set; }
}
public class Choice
{
    public int index { get; set; }
    public Message message { get; set; }
    public string finish_reason { get; set; }
}
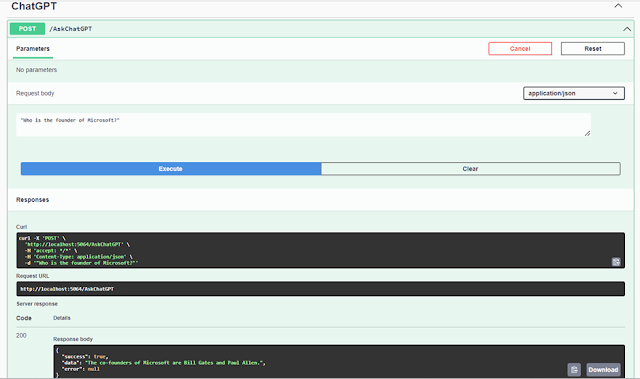
Here is the AskChatGPT API code to accept the query as input, pass it on to ChatGPT and send the query response back to API caller.
[ApiController]
public class ChatGPTController : ControllerBase
{
    [HttpPost]
    [Route("AskChatGPT")]
    public async Task<IActionResult> AskChatGPT([FromBody] string query)
    {
        string chatURL = "https://api.openai.com/v1/chat/completions";
        string apiKey = "YOUR_OpenAI_API_KEY_FROM_STEP1";

        StringBuilder sb = new StringBuilder();
        HttpClient oClient = new HttpClient();

        oClient.DefaultRequestHeaders.Add("Authorization", $"Bearer {apiKey}");
        ChatRequest oRequest = new ChatRequest();
        oRequest.model = "gpt-3.5-turbo";
        Message oMessage = new Message();
        oMessage.role = "user";
        oMessage.content = query;
        oRequest.messages = new Message[] { oMessage };

        string oReqJSON = JsonConvert.SerializeObject(oRequest);

        HttpContent oContent = new StringContent(oReqJSON, Encoding.UTF8, "application/json");
        HttpResponseMessage oResponseMessage = await oClient.PostAsync(chatURL, oContent);

        if (oResponseMessage.IsSuccessStatusCode)
        {
            string oResJSON = await oResponseMessage.Content.ReadAsStringAsync();
            ChatResponse oResponse = JsonConvert.DeserializeObject<ChatResponse>(oResJSON);

            foreach (Choice c in oResponse.choices)
            {
                sb.Append(c.message.content);
            }

            HttpChatGPTResponse oHttpResponse = new HttpChatGPTResponse()
            {
                Success = true,
                Data = sb.ToString()
            };

            return Ok(oHttpResponse);
        }
        else
        {
            return BadRequest();
        }
    }
}
http://localhost:5064/swagger/index.html (Note: port number may be different in your application)
Step 3 (Create Chat Interface)
Since both Chat API and Chat Interface are in the same application, create another controller in the above Chat API project with name called HomeController.cs if it is already exists by default, let’s use the same.Home Controller doesn’t have any logic and it is used to just render the chat interface view. Below is the Home Controller template code with index action method:
[pre class="brush:csharp; toolbar: true;" title="HomeController.cs"] public class HomeController : Controller { public IActionResult Index() { return View(); } } [/pre]
Here is the
HTML for Chat interface UI:
<section class="msger">
    <header class="msger-header">
        <div class="msger-header-title">
            <i class="fas fa-comment-alt" /> ChatGPT
        </div>
        <div class="msger-header-options">
            <span>
                <i class="fas fa-cog" />
            </span>
        </div>
    </header>
    <main class="msger-chat"> </main>
    <form class="msger-inputarea">
        <input id="messageInput" type="text" class="msger-input" placeholder="Enter your query..." />
        <button id="sendButton" class="msger-send-btn">Send</button>
    </form>
</section>
<script src="https://cdnjs.cloudflare.com/ajax/libs/jquery/3.6.4/jquery.min.js" />
<script type="text/javascript">
    const imgBOT = "/images/bot.png";
    const imgPerson = "/images/user.png";
    const nameBOT = "ChatGPT";
    const namePerson = "Srinivas";

    $(function () {
        addChatMessage(nameBOT, imgBOT, "right", "Hey! How may I help you?");

        $('#sendButton').click(function () {
            var message = $('#messageInput').val(); askChatGPT(message);
            $('#messageInput').val(''); return false;
        });
        function askChatGPT(message) {
            addChatMessage(namePerson, imgPerson, "left", message);

            $.ajax({
                url: '/AskChatGPT', type: 'POST', data: JSON.stringify(message), async: true, contentType: 'application/json', success: function (response) {
                    addChatMessage(nameBOT, imgBOT, "right", response.data);
                    $('.imgLoader').hide();
                }
            });
        }

        function addChatMessage(name, img, side, text) {
            const msgHTML = ` <div class="msg ${side}-msg">
                        <div class="msg-img" style="background-image: url(${img})"/>
                        <div class="msg-bubble">
                            <div class="msg-info">
                                <div class="msg-info-name">${name}</div>
                                <div class="msg-info-time">${formatDate(new Date())}</div>
                            </div>
                            <div class="msg-text">${text}</div>
                        </div>
                    </div> `; $(".msger-chat").append($(msgHTML)); if (side == "left") {
                var loaderHTML = `<div id="dvLoader">
                        <img class="imgLoader" src="/images/loader.gif"/>
                    </div>`; $(".msger-chat").append($(loaderHTML));
            } $(".msger-chat").scrollTop($(".msger-chat").scrollTop() + 500); return false;
        }

        function formatDate(date) {
            const h = "0" + date.getHours(); const m = "0" + date.getMinutes(); return `${h.slice(-2)}:${m.slice(-2)}`;
        }
    });</script>
<style type="text/css">
    :root {
        --body-bg: linear-gradient(135deg, #f5f7fa 0%, #c3cfe2 100%);
        --msger-bg: #fff;
        --border: 2px solid #ddd;
        --left-msg-bg: #ececec;
        --right-msg-bg: #579ffb;
    }

    html {
        box-sizing: border-box;
    }

    *, *:before, *:after {
        margin: 0;
        padding: 0;
        box-sizing: inherit;
    }

    body {
        display: flex;
        justify-content: center;
        align-items: center;
        height: 100vh;
        background-image: var(--body-bg);
        font-family: Helvetica, sans-serif;
    }

    .msger {
        display: flex;
        flex-flow: column wrap;
        justify-content: space-between;
        width: 100%;
        max-width: 867px;
        margin: 25px 10px;
        height: calc(100% - 50px);
        border: var(--border);
        border-radius: 5px;
        background: var(--msger-bg);
        box-shadow: 0 15px 15px -5px rgba(0, 0, 0, 0.2);
    }

    .msger-header {
        display: flex;
        justify-content: space-between;
        padding: 10px;
        border-bottom: var(--border);
        background: #eee;
        color: #666;
    }

    .msger-chat {
        flex: 1;
        overflow-y: auto;
        padding: 10px;
    }

        .msger-chat::-webkit-scrollbar {
            width: 6px;
        }

        .msger-chat::-webkit-scrollbar-track {
            background: #ddd;
        }

        .msger-chat::-webkit-scrollbar-thumb {
            background: #bdbdbd;
        }

    .msg {
        display: flex;
        align-items: flex-end;
        margin-bottom: 10px;
    }

        .msg:last-of-type {
            margin: 0;
        }

    .msg-img {
        width: 50px;
        height: 50px;
        margin-right: 10px;
        background: #ddd;
        background-repeat: no-repeat;
        background-position: center;
        background-size: cover;
        border-radius: 50%;
    }

    .msg-bubble {
        max-width: 450px;
        padding: 15px;
        border-radius: 15px;
        background: var(--left-msg-bg);
    }

    .msg-info {
        display: flex;
        justify-content: space-between;
        align-items: center;
        margin-bottom: 10px;
    }

    .msg-info-name {
        margin-right: 10px;
        font-weight: bold;
    }

    .msg-info-time {
        font-size: 0.85em;
    }

    .left-msg .msg-bubble {
        border-bottom-left-radius: 0;
    }

    .right-msg {
        flex-direction: row-reverse;
    }

        .right-msg .msg-bubble {
            background: var(--right-msg-bg);
            color: #fff;
            border-bottom-right-radius: 0;
        }

        .right-msg .msg-img {
            margin: 0 0 0 10px;
        }

    .msger-inputarea {
        display: flex;
        padding: 10px;
        border-top: var(--border);
        background: #eee;
    }

        .msger-inputarea * {
            padding: 10px;
            border: none;
            border-radius: 3px;
            font-size: 1em;
        }

    .msger-input {
        flex: 1;
        background: #ddd;
    }

    .msger-send-btn {
        margin-left: 10px;
        background: rgb(0, 196, 65);
        color: #fff;
        font-weight: bold;
        cursor: pointer;
        transition: background 0.23s;
    }

        .msger-send-btn:hover {
            background: rgb(0, 180, 50);
        }

    .msger-chat {
        background-color: #fcfcfe;
    }

    .imgLoader {
        height: 100px;
        position: relative;
        left: 55px;
        top: -40px;
    }
</style>
You can even download the entire source code project, and feel free to make the necessary changes as you wish.
Hope this helps you to understand the classic integration of ChatGPT with ASP.NET Core MVC application. The process of integration is same for any other technology application. And in my next article I will try to describe on how to integrate the above custom ASP.NET Core Chat API in Angular UI component as a front layer for chat interface.


No comments: