A beginner’s guide to Node.JS
Node.js is an open source, cross platform JavaScript runtime
environment for developing variety of tools and applications. Node.js is a
platform that built on Chrome’s JavaScript runtime. Node.js applications will
be developed in JavaScript and they run within Node.js runtime.
In this article I am going to show you how to setup Node.js,
how you can use it after setup, usage of Node.js modules, NPM packages and Node.js
HTTP Server.
Installation and
Verification
Firstly, download the Node.js from the below link and
install it like you do for any other software.
By default Node.js uses C:\Program Files\nodejs as the default installation path. At the time of installation Node.js will set this directory path in system environment variables. In case if you chose any other path, make sure it is properly registered in environment variables.
Once you install the Node.js, you must verify the
installation to make sure Node.js installed as expected. You can verify the
Node.js installation by using one of the following methods.
Method 1: search for
Node.js from your windows search and find the Node.js file highlighted in below
picture.
Select the Node.js file to launch its Node.js shell as shown
below.
Just provide your JavaScript statement as I did in above
picture. If you can see the output properly, your Node.js installation is
proper and start using it.
If you want to exit the Node.js, give Node command .exit and hit enter.
Method 2: You can
also verify the Node.js installation from your regular command prompt by giving
command node as shown below. Once
you given node command, you will be
switched to Node.js shell.
Once you switched to Node.js shell, give your JavaScript
statement which is done in Method 1.
If you can see the output of your JavaScript statement, then your Node.js setup
is proper.
If you want to switch back to your regular command prompt,
type .exit command and hit enter
Run JavaScript in
Node.js
Now we will start use Node.js runtime to execute the
JavaScript. For this open a notepad (or any other JavaScript editor), write
JavaScript code as shown in below example and save it as “sample.js” in E Drive.
Now open the command prompt, navigate to E Drive and use
command node sample.js as shown
below. The JavaScript code which is in “sample.js”
will be interpret and executed by Node.js runtime and shows the output in
command prompt.
Node.js Modules
Node.js has a module loading feature where one JS file can
be loaded into another JS file. Which is a very useful feature where if you
have a dependent files.
To use the module features, create one more JavaScript file,
name it “module1.js” in the same location where “sample.js” is available. Once
you done with adding your code to “module1.js” file, go to “sample.js” file and
use require statement as shown below
to load “module1.js”
Below is the output when you run the above “sample.js” file
in Node.js.
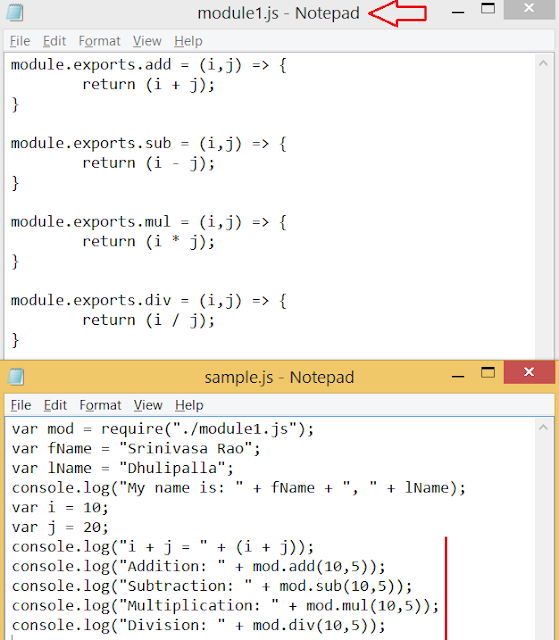
Now let’s make the “module1.js” little bigger with couple of
methods to call them from “sample.js” as shown below:
As you can see in the above “sample.js” JavaScript code,
dependent “module1.js” file is loaded on top and making the calls to module1 at
the bottom of the code. Below one is the output when you execute the above
“sample.js” file.
That’s it about loading modules. Isn’t it so simple? Yes, of
course.
NPM Plugins
Node Package Manager (npm) is used to install the third
party modules/plugins. You can search for NPM packages from npmjs.
Installing/Creating the NPM packages requires the package.json file at the root directory
of “sample.js” file to maintain the dependent files. Use the npm init command to create the
package.json file as shown below.
Once the package.json file is created, we can install the
package using npm install
<package-name> command. Here I’m installing the datetime package and using
the same in “sample.js” file.
Now let’s go and modify our “sample.js” file to make use of datetime module as shown below.
In the above picture you can see we use the datetime module in “sample.js” and
called the formatAgo() method of datetime. Here is the output of
“sample.js” after using the npm package.
Node.js HTTP Server
This title will confuse you. Node.js is not a webserver like
any other IIS, Apache, etc. But within Node.js
you can create a HTTP Server which can listen the HTTP request on a specific
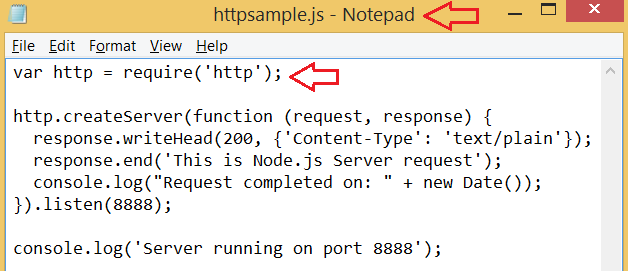
port. Here I am going to create a Node.js HTTP Server which listens the
requests on port number 8888.
Node.js comes with default http module which is used to create the server and listen http
requests. When you run the above “httpsample.js” in Node.js, http server will create
inside Node.js runtime and start listening the requests as shown below.
Whenever you make a request to server on port 8888, Node.js
start responding and take control over the response. You can test this request
by making a call to http://localhost:8888/
When you stop the Node.js http server, your http://localhost:8888/ URL no more valid and
doesn’t respond for your request.
Further Reading Suggestion:
That’s all for now. Hopefully this article gives you more
idea about Node.js and how to use it for your development.
Happy Coding!!! J


Yes, this is a very good example of a verification, thanks a lot for sharing this code, I will use it in my project for sure! Now my project passes the QA test of this company http://www.deviqa.com and if all goes well, I will share the result.
ReplyDeletegreat
ReplyDelete